Sunday, January 31, 2010

We've got you covered - Recovering an Ottoman

I have been meaning to get this up onto the blog for awhile. Here is a pretty cool Before & After job that we did on a pair of chewed & scratched up Ottomans. A woman brought in these (at one point) cute ottomans that her cat had totally destroyed. Since simple upholstery jobs are totally something we do all the time, I said sure, we'll take care of it!

She chose some great chocolate brown microsuede fabric to recover the ottomans. At about $8 per yard and since we would only need about 3 yards to do the two ottomans, this was going to be a relatively inexpensive tune up. (Hooray, says the client!)

The photos speak for themselves.

Before:

After:

Friday, January 15, 2010

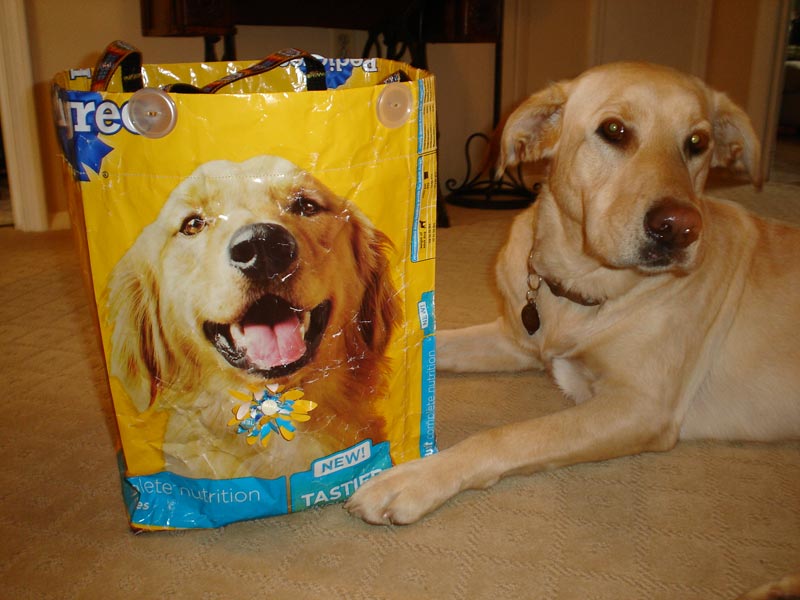
Eco-Friendly Shopping Tote for Dog Lovers


Today I started my day, taking Antonio, my pooch, for a walk. We headed over to the nearby Pathmark cause he was completely out of dog good. I tied him up in a pretty secure place in the back that not too many people know about at the Back Entrance of the Patchmark. I only do this when I know I can run in and run out and since it was about 8am, I knew he would be okay for the 8 minutes it would take me to run in and grab dog food and pay.

We walked back home, with a big bag of dog food in hand & Antonio happily anticipating his breakfast. As he ate and I checked my email, I came across this great tutorial for how to turn that bag of dog food (after it's empty) into an eco-friendly grocery shopper. And here it is, courtesy of the Sewing Savvy Newsletter.


Supplies

  • Dog-food bag -- 20 lbs or larger
  • 1 1/2 yards of nylon webbing
  • Four 1 1/2-inch buttons
  • Embroidery thread and needle
  • Rotary cutter, mat and ruler
  • Sewing machine and basic sewing supplies
  • Flower-shaped paper punch or die-cut machine and flower-shaped die (optional)
  • Washcloth and soapy water to wipe wrong side of bag
Instructions
  1. Remove as many crumbs from the bag as possible. Cut off the top and bottom of the bag using the rotary cutter, mat and ruler.
  2. Turn the bag wrong side out and use the washcloth and soapy water to wipe the wrong side of the bag; let dry.
  3. Open the side folds of the bag and sew the bottom edge of the bag closed.
  4. Fold up the bottom edge of the bag, centering the seam line, and box the corners of the bag by measuring in 3 inches from the corner of each point and marking the sewing line with the ruler and pencil. Sew along the marked line.
  5. Turn over the top edge of the bag 2 inches, and then again 3 inches and press using a press cloth and an iron set on the cotton setting. Sew next to the folded edge through all layers of the bag.
  6. Cut the webbing in two equal lengths and zigzag-stitch across the ends to prevent fraying.
  7. Mark the placement of the webbing handles along the inside edge of the bag approximately 2 inches down from the top edge of the bag.
  8. Use a zigzag stitch to attach each of the handle ends to the bag.
  9. Turn the bag right side out, carefully pushing out each of the bottom corners of the bag.
  10. Use the embroidery thread and needle to sew buttons through the bag and webbing, covering the stitching lines of the handles.
  11. Cut out a flower using the punch or the die cut machine and attach to the front of the bag with a button. This step is optional.

Thursday, January 14, 2010

How Does Custom Lettering Work


With our new fancy shmancy sewing machine, we can now do custom lettering & monogramming on just about anything we can squeeze into an embroidery hoop. We are having lots of fun monogramming and personalizing anything and everything in site. It's adds such a nice personal touch to just about anything.

The other day, I took a little video of exactly how the lettering is done in the machine. It's pretty cool. And keep in mind that there is no one running the machine. You just type what you want on the item into the sewing machine and let it go. Take a look:

Tuesday, January 12, 2010

Great Deals on Private & Duet Sewing Lessons

As you most likely already know, we have a bunch of new, fabulous sewing classes for 2010. And some are in full swing! But what happens if you are interested in learning how to sew, but your schedule doesn't work with any of our classes???

Don't fret - Private & Duet Sewing Lessons are the way to go and this year they are more reasonable than ever!

We have adjusted our Duet Sewing Lessons to make it more affordable for you and a friend to take sewing lessons together.

Right now you can sign up for Duet Sewing Lessons with Megan for $30/Hour or for $90 for a set of four hour-long sessions.

Or take Duet Lessons with Devon for $25/Hour or $75 for a set of four hour-long sessions.

Not bad, eh?

So what if you don't think you are going to be able to find a friend to take lessons with you???  Do not sweat it!

Devon is offering private one-on-one sewing lessons for $40/hour or $128 for four sessions. 
You can't beat that!

Private & Duet Sewing Lessons can be schedule just about any time of day that we don't already have other things going on in the store. If you are interested, purchase the lessons online and then call us or  send us an email with your availability. We will get right back to you to set something up.

And don't be afraid to try us out. You don't have to commit to doing a whole package right away. If you buy one, take the lesson and love, we will apply what you paid for the one lesson to a package of four!

Monday, January 11, 2010

Make your Own Snuggie

A student of mine found this great "Snuggie" Tutorial online. It's been so cold here lately, I thought we have to make this!

So - we are going to be making the Snuggie in our next Meetup/Burda Style Sew Along on Wednesday. There are spots available for this meetup, if you would like to attend, here are the details:
http://www.meetup.com/fashionlab/calendar/12236329/

Please note: This is not a sewing lesson. I ask that you have some sewing experience before attending the Meetup/Burday Style SewAlongs.

And if you can't make it, but are interested in making it at home, here is the great How-to Lauren found (thanks Lauren!):


The Snuglet
A comfy, cozy, easy-to-make fleece blanket
that lets you keep your arms free
without sacrificing warmth!

a project by Welmoed Sisson
welmoed@sissonfamily.com
www.sissonfamily.com/Sewingroom

You will need:
3 yards polar fleece, 60” wide

Cutting
Cut 24” off one short end of the fleece and set it aside; this
piece will become the sleeves (fig. 1)
Fold the fleece in half longways.

Mark location of the armholes. (fig. 2) The armholes will be ovals
approximately 9” high and 6” wide. (fig. 3)

Sleeves
For the sleeves: take the 24” piece and cut in half to yield
two pieces, each 24” by 30”. Fold in half to make a tube
12” x 30”. Sew or serge the long edge. Finish one end of
the tube as desired to form a cuff.
Check sleeve for length; they’re supposed to be loose-
fitting but if you have very short arms you may want to
take a few inches off.
Pin the sleeve into the armhole, making sure to keep the
sleeve seam at the bottom of the armhole. Sew or serge.
Repeat for other sleeve.

Finishing
Since fleece doesn’t ravel, you have many options for
finishing the edges. You can:
• leave the edge plain
• Trim the edge with a decorative rotary cutter (such as a
scalloped or pinked edge)
• Fringe the edge
• Band with a strip of lycra
• Fold over and topstitch for a quick self-banding

You’re finished! Just slip your arms into the sleeves and
relax; you can stay warm all the way up to your chin and
still be able to use your hands!

Thursday, January 7, 2010

Hem Your Own Pants Video

This Saturday we'll be offering the Hem Your Own Pants Workshop from 1-2 at the studio. I found this great Makezine Video illustrating the way we'll be doing it in the workshop:


DIY Fabric Owl Coasters


With the Home Decor Lab Starting tonight I thought I would share a project that we'll be working on in class tonight.

I found the most adorable Owl Coasters tutorial online at Curbly.com. She makes them a similar way to the way we'll be making them in class tonight, and added an adorable owl applique, so I thought might share this easy how-to with you:


How to Sew a Fab Fabric Coaster!

By erinloechner

From Fat Orange Cat:
Jox at The Knitted Blog requested an appliqued coaster tutorial, and I’m happy to oblige. Keep in mind that I’m completely self-taught, so just because I do it a certain way, that does not necessarily mean it’s the “right” way to do it! But I’ve established a way that works well for me, which I’m happy to share.


Advertisement


1. Cut two pieces of 4.5″x4.5″ fabric and one piece of 4.5″x4.5″ batting. Set aside.

2. Draw or trace a pattern or shape in reverse onto the liner of your double stick fusible web. (First check to see which side of the liner you should draw on by peeling it apart slightly at the corner. You will draw on the side of the liner that’s still attached to the web.)

3. Peel off and discard the side of the tracing paper that you did not draw on. Stick the remaining side to the wrong side of a piece of fabric (it will not permanently stick until you iron it into place, so reposition as necessary).

4. Cut the fusible web and the fabric together along the line that you drew.
5. Peel off and discard the remaining side of the tracing paper, ensuring that the web stays stuck to the fabric.

6. Place the shape — web-side down — onto the right side of one of the pre-cut 4.5″x4.5″ pieces of fabric. Reposition as necessary. When you’re happy with the placement, iron it permanently into place by pressing for 10-15 seconds.

7. Repeat steps two through six as necessary until you’re done with your applique design.

8. Stack your three 4.5″x4.5″ pieces: batting on the bottom, one piece of fabric in the middle with the right side facing up, and one piece of fabric on top with the right side facing down. (This picture is set up just to show you which way each piece of fabric should face. When you’re ready to sew the three pieces together, they should be stacked one directly on top of the other and pinned together.)

9. Sew all three pieces together with a .25″ seam allowance, leaving a 1.5″ opening so you can turn the coaster inside-out. Trim the corners as shown.

10. Turn the coaster inside-out, ensuring that the layer of batting is on the inside, between the two layers of fabric. Gently push the corners out using a knitting needle or a chopstick. Hand stitch the 1.5″ opening.

11. Put something hot or cold on your new coaster. Repeat step 11 as neccessary.