Saturday, February 27, 2010

Who wants a fabulous checkbook cover?!

I know I want one!
 
I found this cute checkbook cover tutorial linked to one of my favorite blogs Craftzine.  Since our meet up group challenge is in a few days I thought it would be perfect to show a project that again requires less than a pound of fabric.  There are several steps to the tutorial but Step 5 is optional so you can pretty much stop there!  It all depends on how detailed you want the checkbook cover to be.  Check out the tutorial and maybe you will be inspired to make one!


*A project by Kristine Tsai

Step 1: Cut the fabric

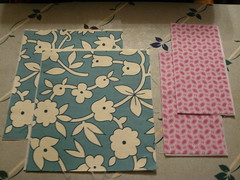
From the outer fabric, cut two 7×8-inch (WxL) pieces. Cut two pieces of interfacing the same size.
From the pocket fabric, cut two 7×7-inch pieces. Cut two 7×3.5-inch pieces of interfacing.
Cut two 2×4-inch strips of the outer fabric.
Cut a 7-inch piece of 1/4-inch elastic.
Step 2: Make the pockets
Take one pocket fabric piece and fold it in half wrong sides together. Press. Open the pocket up again and insert the interfacing between the layers and close the pocket again.

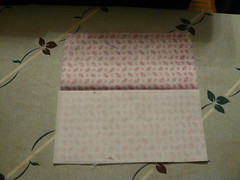
You should now have a nice 3.5×7-inch pocket. Baste along the open edge (the one across from the folded edge) together. If you’re a fan of top-stitching, top-stitch across the folded edge. You can also use some fancy stitches here if your machine has them.

If you want to embroider anything on the pockets, now is the time to do so. Keep in mind that you’ll lose about 1/2+1/8 inches around the sides due to the seams and top-stitching.Repeat for other pocket.
Step 3: Prep the Outer Cover and Lining

Take each outer fabric piece and baste the corresponding piece of interfacing to it.Now is a good time to decide which cut of the outer fabric you prefer to be on the outside of your checkbook. Place that one aside.
Step 4: Complete Lining (Pocket Placement)
Take the other outer fabric piece (this will be the lining of the checkbook) and place the pockets width-wise, lining up the raw edges. Make sure the folded edges of the pockets face each other and the center. Baste around all 4 sides.

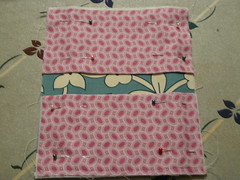
From here, I’ll refer to the transaction register pocket as the “top” pocket, and the check pocket as the “bottom” pocket.
Step 5: Closures and Holding Pieces
This step is optional. Depending on how you like your checkbook, you can use these ideas or come up with completely different ones.

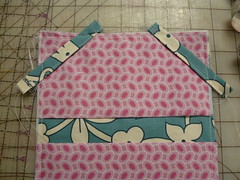
a) First, we’ll make some pieces to hold the used pages of your transaction register.
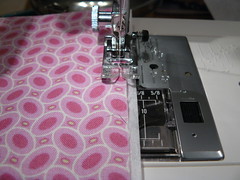
Take one of your two 2×4-inch strips. Fold in half length-wise (wrong sides together). Open up and then fold the long edges towards the crease you just made and fold it in half again (pretend you’re making a really tiny and skinny bag handle). Sew 1/8-inch across the open long edge. There should be no raw edges on the long sides now, and your strips should be 1/2×4-inches.
Repeat for the other strip. You can also use ribbon here if you prefer instead of making your own strips.Position these pieces on the top pocket at a 45-degree angle, approximately 1.5 to 2-inches from the corner in each direction. Baste in place and trim off excess.
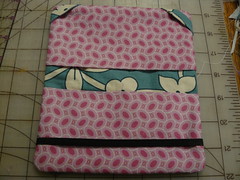
b) Now we’ll add a piece of elastic to hold the checkbook closed.
Take your 7” piece of elastic. Place it about 1.5-inches up from the bottom of the bottom pocket. Baste in place.
Step 6: Putting it together
Take the outer piece you set aside earlier. Now you want to decide which part will be the “top” (the side you’ll see when the book is sitting on your desk) of the checkbook exterior once you fold it in half. Embroider as desired (I originally wanted to do initials, but I was too lazy to). Take care in accounting for the 1/2-inch seams and 1/8-inch top-stitching when positioning your embroidery.
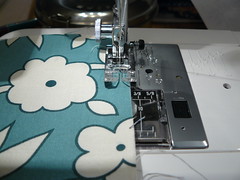
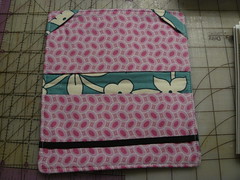
Pin right sides together with the inside piece. Make sure you orient the exterior piece so that the top part of the exterior faces the transaction pocket part of the lining. Sew along all four sides with slightly more than 1/4-inch seam allowance to hide all the basting stitches. Don’t forget to leave a gap for turning! I usually put the gap at the one of the shorter edges. Turn right side out and press.This is what it should look like. You can see how our optional holding pieces from Step 5 will work.

Now is the time to check the fit of the cover with your checkbook stuff. Upon putting it in, you want at least 1/4-inch space of horizontal wiggle room to accommodate the top-stitching. If you have too much excess wiggle room, flip the cover inside out again and stitch around with a up to 1/2-inch seam allowance. I had some variation when I made mine—the first one used a 1/2-inch seam allowance and it turned out perfect. The second required a 1/4-inch seam allowance along the length (8-inch direction) but could still use a 1/2-inch seam allowance along the width (7-inch direction).Once you’re happy with the fit, clip the corners and trim the seams to reduce bulk.
Step 7: Finishing it off
For the last time, turn right side out, press, and then topstitch around the entire edge. We’ll be closing gap you left for turning with this topstitch.

Press again. Fold in half, and press the crease. Insert checks/transaction register and you’re done! HURRAH!

Thursday, February 25, 2010

New Ipod Case

So after posting yesterdays blog I am still thinking of fun projects to do with a pound or less of fabric.  I have been wanting to create a new ipod case so I came upon this tutorial from the Crafting A Green World website.
This site has tons of project ideas for creating something from less than a yard of fabric, as well as "green" sewing ideas.   You can make this ipod case unique by adding embellishments such as buttons or fabric cut outs.  You can even make a button closure using ribbon or a skinny piece of fabric.  If you want the case to be a bit thicker try using felt or a scrap of fleece for the back piece.  Its super easy to make!


Here are the instructions:

What you need to do is lay your iPod, mp3 player, or camera down on a piece of scrap.  Using a sewing pencil or a marker, draw an outline at least 1/2 inch away from what you’re making the cover for.  You’ll need two pieces of fabric, so be sure to have two sides.  Place your scraps with what you want to be the outside facing each other and the backs facing out.  From here you can either machine sew, or blanket stitch, them together.  Leave the top open.  If you want to hem the top, a simple way to do it is fold it over, iron it, and then machine sew it around.  For something so small, though, it may be easier to hand stitch.


*Photo taken from Claire's Crafty Blog
*Project instructions by Lenore MacLeod-Bickley from Crafting A Green World

Wednesday, February 24, 2010

Fabric Covered Corkboard

One pound of fabric doesn't seem like much but you would be amazed at how many projects you can actually make!

In our next sewing meet up group we are going to have a "Project Runway" type challenge.   Each person has been coming by and picking up a pound of fabric from an assortment of beautiful sample squares and remnant pieces.  Each  person will then have to create an item of their choice using only this pound of fabric.  This project can basically be anything from clothing, accessories, home decor, or anything they wish to create.  Then at the next meet up we will all show each other the cool projects we came up with.

So I thought it would be fitting to share this project I found from this great blog Elle Belle that has some fun project ideas.  This project in particular only only requires about a pound of fabric.  This is where I found the tutorial for these awesome fabric covered cork boards. In the tutorial they used 4 pieces of 12  by 12 cork, to create four different boards.  But you can pretty much make it whatever size you want.  Its a great idea for a present, or to add a little something unique to your home.  You can use it to tack up pictures, grocery lists, or as an inspiration board for future sewing projects. Take a look:


*A project by Elle Belle
http://ellebelleblog.blogspot.com/

Supplies:
Cork (I picked up a package of 4 12x12 cork tiles at a big box store for about $8), scissors, spray adhesive, a stapler (if you have a mini one that uses smaller staples so they don't poke out the other side of the cork tile that might save your fingers in the long run), some ribbon, the little adhesive thingies that come with the cork tiles to mount it to the wall, and fabric.


Step 1 - Cover the cork: Cut your fabric about an inch and a half bigger than your cork tiles (mine was smaller because I working with scraps). Lightly coat one side of the tile with spray adhesive and lay your fabric over the tile. Smooth the fabric out with your hand to remove any wrinkles. Flip the tile over and staple the excess fabric around the back.


Step 2 - Embellish: I laid the three covered tiles on the floor in the order that I wanted to hang them and laid pieces of coordinating ribbon on them in a pattern that I thought made a nice over all design and would also be functional for holding notes and such. Staple the ribbon onto the back of the tile.


Step 3 - Finish: If I were giving these as a gift I would cut a piece of card stock about half and inch smaller than the tiles and glue it onto the back to cover all the staples and rough edges. Apply the adhesive squares that come with the tiles (I only needed one in each corner and one in the center). Get out your level and stick away! Or, tie them up with some string and add a handmade tag!


*A project by Elle Belle
http://ellebelleblog.blogspot.com/

Sweet Tees & Crumpets

Time to have a Girls Night Out "Tee" Party !


Get your ladies together for a night of T-shirt Deconstruction.


In this private party each guest starts with a plain used t-shirt and turns it into any of our fabulous deconstructed styles.


Our instructors will teach your group the basic design & sewing skills needed to play fashion designer for the day!


Get a group of six or more ladies together and everyone will design and stitch their very own custom deconstructed t-shirt and leave with it after the party. Don't worry, there is absolutely no sewing experience required!

You do the leg work, our staff will do the finishing touches to make sure your finished product is sturdy and professional looking when you take it home after this two-hour private party.


Check out a few of the photos, taken by photographer Adam Gallagher, of our first "Tee" Party. 

Or head to the website to find out all the details.