Tuesday, January 5, 2010

Today Project of the Day - Sewing a Zipper into a Dress


The Fashion Lab Dress Lab starts this evening and I am very excited to be teaching this class! We will be working on the pattern for the dress to the left. It's a fairly straightforward pattern, but the two challenging aspects of it will be learning how to do darts & zippers.

I found a great series of videos on Youtube demonstrating a super easy way to insert a zipper into a dress. Take a look here to check it out.

Step 1 Step 2 Step 3

People get really bogged down in the thought of inserting a zipper while sewing anything. It's really not difficult at all if you take your time and use a zipper foot. I think this video from Expert Village does a really good job of showing you just how easy it really is.

Sunday, January 3, 2010

Macaroni & Cheese - I kind of made up the recipe...

So I suppose we are going to need more to eat at my friend Heather's (sort of) baby shower/ informal dinner...

Heather is a super-fan of all comfort foods, so we decided homemade mac & cheese would be perfect for the menu.

Yes, I know that I probably have endless mac&cheese recipes in this apartment, not too mention all the kick-ass recipes I am sure to find online, but I figured, I had this one covered. I would come up with a little batch of delish mac & cheese based on the cheeses that I bought for the occasion, and supplement with what I have in the refrigerator right now.

Here is how the recipe went down:

I put about half a stick of unsalted butter in a large pan and melted it. I added about a 1/4 cup of unbleashed flower to that and browned it a bit. I added about 3/4 of a cup of 2% milk to this and brough everything to a boil. I would have much rather used half & half, but didn't have any...

To this concoction, I added what was left of a four cheese shredded blend from Trader Joe's (about 1/4 of a 12 oz. bag), I shredded what was left of a mozz log (from our NYE pre-dinner snack), I added about 1/3 of a fontina cheese wedge (shredded of course and then I added about 1/3 of a bag of shredded sharp cheddar.

I tasted the blend and whilte it was tasty, I was totally wishing that I had a little stronger of a cheese in there, but it is WAY too cold to make a grocery store run right now. These four cheeses are going to have to make due.

While all this was happening, I cooked about a pound of bow-tie pasta and when that was finished, add the cheesy goodness to the pasta. I mixed it all up, resisted the urge to get out a fork and just dig in right then and there, and put the macaroni into the dutch over. I sprinkled a handful of seasoned bread crumbs to the top of the pot and stuck it into the 350 degree oven.


Saturday, January 2, 2010

Get a load of this - Salty sweet chocolate cake


Yesterdays project involved this great cookbook I checked out from the library. It's called Baked - New Frontiers in Baking and it's full of recipes from their Brooklyn Bakery.

Their signature creation, most requested recipe and most beloved cake at the bakery is the Sweet & Salty Cake and I couldn't wait to try it. Since today some friends and I are putting on a little informal baby shower for another friend I thought this would be the perfect excuse to try the cake and bring it over for the shower. And let me tell you I CANNOT wait to try this little cake!

Now, as you can imagine, their recipes are not simple. But I guess none of the recipes that I ever want to try, are simple. This one, actually really wasn't that bad, but I baked the cake layers a day ahead. I made the caramel and frosting yesterday and put the cake together. Since lately my apartment temperature hovers around 59 degrees, it was the perfect temperature to make a perfect buttercream and assembling the cake was a snap!

Here is the list of ingredient for the three components of this cake:

Classic Chocolate Cake Layers:
3/4 Cup dark unsweetened cocoa powder
1 1/4 cups hot water
2/3 cup sour cream
2 2/3 cups all-purpose flour
2 teaspoons baking powder
1 teaspoon baking soda
1/2 teaspoon salt
3/4 cup (1 1/2 sticks) unsalted butter, softened
1/2 cup vegetable shortening
1 1/2 cups granulated white sugar
1 cup firmly packed brown sugar (which I just realized I forgot to put in, uh oh)
3 large eggs at room temperature
1 tablespoon pure vanilla

For the salted caramel
1/2 cup heavy cream
1 teaspoon fleur de sel
1 cup sugar
2 tablespoons light corn syrup
1/4 cup sour cream

For the Whipped Caramel Ganache Frosting
1 Pound Dark Chocolate, chopped
1 1/2 cups heavy cream
1 cup sugar
2 tablespoons light corn syrup
2 cups (four sticks) unsalted butter, soft but cool, cut into 1/2 inch pieces

And you need roughly 5 teaspoons of fleur de sel (sea salt), for the layers of the cake and for the garnish.

Now to make the cake, pre-heat the over to 325 degrees (thank god, this totally warmed up my apartment on this frigid weekend!) butter/oil three 8" round cake pans, cut out parchment paper rounds that fit in the bottom of the cake pans and oil them, as well.

To make the cake batter combine the cocoa powder, hot water and sour cream and set aside to cool.

Add the flour, baking soda, baking powder and salt together into a medium bowl and set aside. (I will be honest, I amost never do this for cake recipes. I end up just adding all these dry ingredients to my wet ingredients at the end. I am a big fan of not dirtying as many bowls as most recipes suggest and most of the time, the recipe comes out just fine.)

Beat the butter and shortening in the kitchenaid with the paddle attachment for about 5 minutes. Add the sugars and beat until light and fluffy. Add the eggs, one at at time and beat between each addition. Add the vanilla and beat a little more. Scrape down the sides of the bowl and beat for another 30 seconds.

Add your dry ingredients, alternating with your cocoa mixture. Divide the batter between all three cake pans and bake for about 40 minutes, until you can stick a fork in the middle of the cakes and the prongs come out clean.

Make the salted caramel by adding the cream and the sea salt. Heat until the salt is all dissolved.

Add 1/4 cup of water, the corn syrup and the granulated sugar to a different saucepan. Heat on high until the mixture reads 350 degrees (6-8 minutes). Remove from heat and let cool. Add the cream mixture to the sugar mixture and let it cool. Put it in an airtight container and store in refrig until you are ready to assemble cake.

Making the caramel ganache frosting start out the same way as above.

Make the salted caramel by adding the cream and the sea salt. Heat until the salt is all dissolved.

Add 1/4 cup of water, the corn syrup and the granulated sugar to a different saucepan. Heat on high until the mixture reads 350 degrees (6-8 minutes). Pour the mixture over the dark chocolate in another heat-proof bowl. Let it sit for a minute until it starts to melt the chocolate.
Mix up this mixture until all the chocolate is completely melted. Let it cool and transfer to your mixer bowl. Beat this chocolate on low until it's completely cool.
Increase the speed to med-high and start adding the butter in small pieces until all is completely incorporated . Beat on high until the mixture is fluffy.

Assemble the cake

Place the first layer of the cake on a serving platter, add 1/3 of the salted caramel and spread it out. Add 1/4 of the ganache frosting and spread it out. Sprinkle some sea salt over this layer and add the second layer of cake. Add the caramel, frosting and sea salt in the same way. Add the third layer of cake and caramel. Crumb coat the cake with the ganache and put in the refrigerator for about 30 minutes. Frost the cake with the rest of the frosting and garnish with the remaining sea salt.

Phew - done - Finally!

I will let you know how it tastes after we sample it at the shower dinner tonight.


- Posted using BlogPress from my iPhone

Friday, January 1, 2010

Day one: I made pickles

Happy New Year!

Today is a New Day, a New Year and a New Decade

In 2010, I am going to make something new each and every day and blog about it here.

Today, when I woke up, I went upstairs to clean my kitchen from my NYE Homemade Ravioli mess last night. They were so delicious, but so messy!

The other day I picked up some small English cucumbers at the market. They were perfect for making dill pickles. They happened to have some great fresh dill at this same market, so I knew that pickles would definitely be in my future.

To make the pickles I used a recipe from a great old book, I found at the antique mall by my parents last weekend. It's called Mother Earth's Hassle-Free Vegetable Cookbook. This has been the first recipe I have used from the book, but based on how easy (and yes, hassle-free) the pickle recipe was, I will definitely be making more recipes from this book.

Here is the recipe:

30 Cucumbers
1/2 cup course salt
2 quarts water
2 tablespoons vinegar
4 cloves garlic
4 bay leaves
1/4 teaspoon mustard seed
1 teaspoon mixed pickling spice
10 sprigs dill

Now - I had no idea what "pickling spice" was, so after googling it, I found this page and it had some great recipes for making your own pickling spice. But since I didn't have most of what was called for in the pickling spices, I kind of did my own thing.

I made the brine by adding the salt to the water and then letting it come to a boil. I then let it cool and added the vinegar. I had cut the cucumbers in half lengthwise so that I could fit them bettering into my small canning jars.

I washed and dried all the jars and lids really well. I was able to get 5-6 halves into each jar. I also put one bay leaf and one garlic clove in each jar. I placed one sprig of dill into each jar as well. I filled the jars with the salt/vinegar solution and put on the lids. It says to keep them in a cool place and test one after 5 days.

I will let you all know how they turned in about a week!

d

- Posted using BlogPress from my iPhone

Tuesday, December 8, 2009

I'm mobile blogging

From my bed. How I love thee, oh magical Iphone.


- Posted using BlogPress from my iPhone

Wednesday, November 11, 2009

Custom Lettering & Embroidery

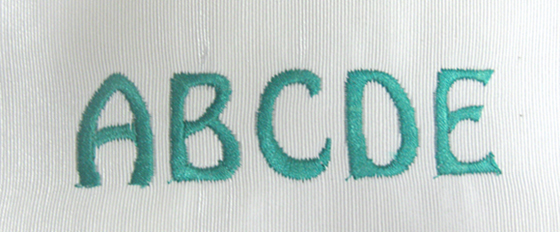
Well, it's finally here! You can now get any and all of the custom products monogrammed & embroidered.

Get your name on just about anything!

We have five different adorable fonts to choose from and you can choose whatever thread color you desire.

Perfect for the holidays!

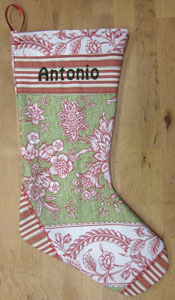
And get your orders in NOW for the custom Christmas stocking. It's $29 Complete with embroidered names.

Check it out here.


Tuesday, November 3, 2009

Now Offering Classes for 4,5 & 6 Year Olds


M Avery Designs is now offering crafting classes for 4, 5, & 6 Year Old's on Saturday Mornings. Kids will learn how to trace patterns, how to cut fabric & felt, how to hand sew using plastic sewing needs and embroidery floss, as well as basic design & construction skills used in making the described crafts.

Each one hour class will be project oriented and each student will leave classes with their finished projects. There are only 10 spots per session.

$40 for the series of four classess + One Parent Volunteer Help Day
(Each parent is asked to choose one class per series to help with instruction)

If there is space, you may register on a class by class basic for $15 per class. Please note, first priority will go to students registering for all four classes in the series.

All Supplies are included.
Class 1 Upcycled Sweater Felted Mittens
Class 2 Owl or Butterfly Hats
Class 3 Animal Pillow/Pajama Bag
Class 4 Snow Globes

2009/2010 Schedule
Saturdays 2009
nov 21, dec 5, 12 & 19 10-11am
3 spaces left
Saturday 2010
jan 16, 23, 30 & feb 6 10-11am
sign up now