Today I was lucky enough to spend most of my afternoon making bias tape from scratch. I needed about 9 yards of bias tape to create piping that would match the fabric I am using to cover a cushion for a customer. The cushion, which will be used to cover a storage unit on her enclosed porch is, no doubt, going to be gorgeous, but it has been such a pain the neck to create the piping.
I thought it was pretty funny that I just read this review in my latest Sewing Savvy Newsletter that just appeared in my in box and I thought I just had to pass it along:
I first saw the Simplicity® Rotary Cutter and Bias Tape Maker during my visit to the Pittsburgh Quilt Show this past spring. I watched as the demonstrator showed the process of creating yards and yards of bias tape in minutes and was intrigued. Would it be quite so simple if you did not have all of the items prepped for the demonstration? How long does it actually take to make three yards of bias tape the old-fashioned way of cutting the strips, inserting them through the hand-held bias tape maker and pressing while pulling the fabric end through the tape maker. I decided to explore the art of making bias tape using the Simplicity machines.
 The first part of the test was to open the box of the Rotary Cutter machine, read the instructions and give it a try. I give it high marks as I managed to obtain great results the first time around with only a small adjustment having to be made, raising the blade for a perfect cut. I was able to change out the blades in the machine in minutes, and the serrated blade worked just as smoothly as the straight blade. The sliding adjustment bar is clearly marked, and with just a little practice, I was able to feed the fabric through the machine perfectly.
Conclusion: If you are in need of yards of pre-cut fabric strips, whether straight cut or bias, this machine is fast, and you have the ability to cut continuous yardage for your project. Just imagine one continuous strip, no seams in sight.
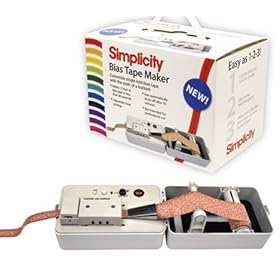
The second test came when I opened the box containing the Bias Tape Maker. Once again the instructions were pretty clear and I did not have to wait too long for the light to come on indicating the machine was ready. I liked the fact that I can choose the heat setting, and the indicator light lets me know when everything is ready to go. After rolling the fabric onto the spool and fitting it into the machine, I used a straight pin to insert the end of the strip into the bias tape maker. I find cutting the end of the fabric strip at an angle is extremely helpful when feeding it through the taper maker. I snapped the heat cover over the fabric strip and was able to create perfectly pressed bias strips in no time at all. I am told that the spool is able to hold 12 1/2 yards of fabric strips, which is enough to bind a king-size quilt.
 Once again, if multiple yards of pressed bias strips are needed, this is the way to go. I quickly learned just how fast I could press the fabric strips with not one burned finger. The key, I believe, is to have a designated location for your machines, which eliminates the need to set them up each time they are called into service.
I have heard from my Simplicity® sources that new blades in a variety of cutting shapes as well as additional sizes for the bias tape maker are on the horizon. This is welcome news as I think I am addicted and eagerly await their arrival.
No comments:
Post a Comment